Wednesday 19 October 2011

Pickled Beets

Here we go again, another Fall... another batch of pickled beets!
I think this year's batch of pickled beets are my best yet, and here is my recipe:

6 lbs beets (or so)
2 C white vinegar
2 C water
4 C brown sugar
3-4 Tbsp. pickling spice tied into 2-3 cheesecloth "sachets"

A tip before you start:
Make sure everything involved is good and hot, that way you'll have no problem getting your lids to seal!


Start by getting your beets! The beets here are my rather large beets grown in my garden.


Wash the beets, and cut off both ends. Continue to peel them with a sharp pairing knife and slice into bite size pieces. 


Most people boil their beets, but I'm anti-boiling as I believe you lose flavour. Last year I roasted them in a tented tin foil pan, 400 degrees for 45-60 mins (until tender). This year I steamed them. Either way works good!


At some point along the way, get your brine going. Simply put all the ingredients into a pot and bring to a boil, reduce heat to low and simmer for a while... like 15 mins or so. This picture is hilarious... I realize the pickling spice "sachets" resembles ... something. Anyhow, neither here nor there... the sachets are awesome because you get the pickling spice flavour without the chunks and flakes of pickling spice on your beets. 


Meanwhile, preheat your oven to 225 degrees, then "bake" your clean jars for 10 mins to sterilize them.


oops, I forgot to take a pic... but you must also boil the sealing discs (lids) in a small pot for 10 mins or so. 


Fill your jars with your cooked, sliced beets up to the start of the rim. Then ladle your hot brine over the beets, covering them. Make sure you leave 1/2" or so from the top of the jar. When they are complete, dampen a paper towel and wipe the tops of the jars. Make sure they are clean! Using tongs, place the sealing discs on the jars directly from the boiling water. 


Voila! Beautiful pickled beets!


Wednesday 28 September 2011

Damn Good Chili, Skillet Cornbread and Cocoa Brownies

Damn Good Chili

Okay, so I made this chili today and took pics and everything to share. Chili is one of those dishes that can be made a million different ways, but if you want a super tasty family friendly version -this is the chili recipe for you. 


Ingredients:
2 lbs ground beef
½ lb pork sausage or ground pork
4 cloves chopped garlic
1 chopped onion
3 Tbsp chili powder
2 Tbsp cumin
2 tsp paprika
2 tsp oregano
½ tsp ground coriander
1 can beer
1 can tomato sauce
1 can kidney beans
1 can black beans
1 can tomato paste
2 Tbsp beef bouillon
1 Tbsp sugar
1 tsp cocoa powder
1 Tbsp hot sauce
1 Tbsp cornmeal
1 Tbsp flour
1 cup corn


Start out by browning the meat in a big dutch oven or heavy pot. Use pork as well as ground beef to add more flavour. Also, use lean ground beef! If you cook it well, it doesn’t require draining. 


I used half a tube of frozen pork sausage. Easy to cut with a bread knife. 

just wanna clarify, this the meat "still cooking", about 5 mins before adding other stuff!

Once the meat is good and cooked, add the onion and garlic and cook some more. 


Then add the spices, stir and cook a couple of minutes. I like to add the spices at this stage in order to “toast” them a bit. Some of the spice will cook out by serving time, and you will have to taste it and possibly add some more spice at that time. 

This is after I added the beer!
After the spices are added and cooked in, add the rest of the ingredients minus the corn. Corn certainly does not need to “slow cook” all day long. Add the corn like ½ hour before serving. Cover and simmer the chili for the day, stirring every so often. Or cook it the day before and re-heat for serving. 


PS might have to add a cup of water. Enjoy! 


PPS Oops, I forgot to take a pic of the final result. So just imagine a pic of a bowl of (good looking) chili, with a dallop of sour cream and a sprinkle of cheddar cheese on top!


Skillet Cornbread 

I always make cornbread to go with my chili, and here is a really good recipe that I altered and made last night! Using a cast iron pan makes for a crusty crust and looks cool too :)


Ingredients:
1 ½ cup cornmeal
½ cup flour
½ tsp baking powder
½ tsp baking soda
1 tsp salt
1 egg
1 ½ cup buttermilk
¾ cup margarine (divided)

Heat your cast iron pan while preheating the oven to 450 degrees. In a bowl, whisk together the cornmeal, flour, baking powder, baking soda and salt. Add eggs, buttermilk and 1/2 cup melted margarine, and quickly whisk together! 
Remove your HOT skillet from the oven, add 1/4 cup margarine and let it melt. Pour batter into pan and bake for 15 mins. 
Tip: if you don't have buttermilk on hand (and who does), then put regular milk into a cup and add a Tbsp of lemon juice or white vinegar. 


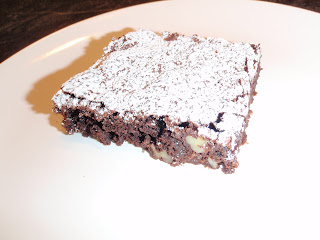
 My yummy yummy easy Cocoa Brownies


I have the easiest and yummiest brownie recipe to share. If you want a fancy recipe that uses actual chocolate and butter, or perhaps lines the pan with parchment paper -then this is not the recipe/blog for you. I believe in super yummy, but SUPER simple. So here goes:


Ingredients:
3 eggs
1 ½ cup sugar
2 tsp. vanilla
¾ cup veg. oil
¾ cup flour
½ cup cocoa powder
1 tsp. baking powder
pinch salt
1 cup chopped pecans or walnuts
icing sugar


Start by beating the eggs, then add the sugar and mix away. The secret to these brownies is a lot of sugar… not gonna lie. Then add the vanilla and mix. Add the oil, flour, cocoa, baking powder, and salt and mix until … mixed. Finally add the nuts. My trick for chopped nuts is: always buy whole when it comes to pecans and/or walnuts. Whole is just better. Put the required amount of nuts in a sandwich baggy and beat it with a rolling pin. NOT too much, just enough so they look right (not powder). Prepare your 13 x 9 baking pan A LOT with cooking spray and pour in your batter. Make sure it is evenly spread before baking at 350 degrees for 25 mins. 

PS Okay, so when I say A LOT of cooking spray, I mean spray the crap out of it. These brownies have a tendency to stick (all that sugar!). They will be fine if you spray well, and use a fork as a "spatula" to pop them out. 


PPS dust with icing sugar when they are cooled


Saturday 10 September 2011

Tureky Pit Cook

As promised, I pit cooked a turkey on Labour Day weekend. Again, we were at the cabin which is the perfect spot to pit cook. This time around I was a little more nervous. The turkey was GIANT to begin with, and I was cooking a lot more in the pit than the last time.

We started out in the morning by digging the hole and adding some bigger rocks (thinking they would retain heat better?). And when I say we, I mean my husband which all the pics prove! Damn!


After the fire was roaring, we relaxed and my sweet husband served me coffee in this mug, which is nice...

Next up, the never ending wrapping up food in tin foil!


Russet potatoes, beets (from the garden -yay), and corn on the cob. Also, one giant turkey!


We ("we") put the turkey in the embers first, then layered on beets and potatoes and ended with the corn. 


The "we" buried the lot!


Everything was in the ground by 11:30, so off we went to enjoy the day. 

Ezra scurfing

Around 6pm, I started to dig!


Jeremy took over with some handy gloves...


Hmmm, is it done?


It is! The turkey is really delicious, and everything tastes amazing. 


Turkey dinner, pit cook style!

Monday 8 August 2011

Pit Cooking: First attempt - Whole Chicken and Spuds

After reading "Clan of the Cave Bear" I became obsessed with attempting to "pit cook". I thought our cabin at Victoria Lake would be the perfect place to try it out due to the fine rocky beach.

First things first, I dug a hole... I didn't think to take a picture of my hole... DAMN, sorry to disappoint - no hole pics. It was pretty exciting though, at about a foot and half deep by a foot and a half wide? Fun times digging a hole on our beach. It was actually relatively easy considering the nature of the beach. Fine, loose rocks - perfect... no sweat there.

WHOA oops, ACTUALLY "first things first" is not to dig a hole, in fact the first thing to do is to find some big rocks and heat them up in your fire starting in the morning. I asked Jer to pick up some big rocks from a nearby beach (our beach has NO big rocks), and then threw them in our fire in the morning. They were like, football size? (maybe a titch smaller).

Now that the rocks were nicely heating up (all day long), I dug a hole. Later, around early afternoon... I shoveled the hot rocks into the bottom of my hole and proceeded to start a fire on top of the hot rocks in the hole. Okay let's be honest, Jeremy proceeded to start the fire in the hole. He burned yew wood, which apparently makes for "good embers". After my fire burned down to mostly embers (like an hour or so), I added the goods!

So, I double wrapped my whole chicken and russet potatoes in tinfoil, and laid them right on the embers. Then I buried the whole lot with the little beach rocks... and... waited...

In the meantime, we had the best cabin day ever. Sun was shining, friends and parents came for a visit, kids were swimming, and we had cold beers. Good times for sure! One of the cool things about pit cooking is you can do all the work earlier in the day, and literally forget about it! Which I actually did, at first I was like checking the top of my "burial" for heat and not finding any, actually digging down until I did. And then, like totally forgot about it. Around dinner time, while I was preparing "over the campfire spaghetti" (as I was NOT banking on the chicken actually working out), I remembered about the chicken in the ground! Oh ya! Ran over to my chicken grave and the top was HOT!!! A good sign!!!

So dig dig dig, and can I just say everyone was extremely skeptical about this pit cooking thing. But even though it seemed weird, I was pretty sure it would work out! I had done my research after all!


This is my Dad, gf Jenny and myself
"being skeptical"


Aaaannnnd, it's cooked! The chicken and potatoes are PERFECT! Moist, tender and delicious! Nobody can believe it! Haha, especially my Dad! 


Pit Cooking - Second Attempt is coming up. Labour weekend, we're hauling out our frozen turkey and will attempt to pit cook it! Turkey dinner at the cabin... next up!